See how TestFairy can help you at testfairy.com
TLDR; Skip to the “How do I compress an H264 video?” section if you already know what “bitrate” and “codec” mean. Skip to the end of the article if you’re just looking for code.
Chances are there will be a time when you’ll need to capture a video within your app, compress it to a respectable size, and then send it to your server to fulfill some feature of your app. Maybe your app is a video sharing platform where people showcase their talent. Or maybe your app overlays some special effects on people’s faces. The more users your app has, the more bandwidth your server will require, not to mention the storage space. The state of technology today means that most iPhones are more powerful than some desktop gaming computers and are also bundled with industrial-grade cameras, so the disk space a single video consumes increases tremendously every year. Unfortunately, cloud service providers’ price tag for storage and bandwidth do not reflect this increase. As an obsessive optimization guru, you know that there must be a way to utilize all of the horsepower in our phones. Below you will find a line by line explanation of how to do that.
What sets the size of a video file?
A video file is actually two files attached to each other, assuming that the video is not 3D and that the audio is not multi-language. One file is a silent slideshow of pictures and the other is the audio to be played along with the slideshow. Both of these parts contribute to the final video size and the only determining factor of the individual file size is a thing called “the bitrate.”
Bitrate is the amount of bits (8 bits = 1 byte) required per one second of a video/audio file. If you know the bitrate of the video and audio, as well as the duration of the file in seconds, you can accurately calculate the final file size even if you have no idea what the video resolution or playback frame rate is. In other words: two video files compressed with the same bitrates (i.e one is HD and the other is not) will ALWAYS consume roughly the same amount of storage space.
The final formula to calculate how many MBs to expect after the compression is simply:
Duration (seconds) x (Video Bitrate + Audio Bitrate)
———————————————————————- MB
8 x 1024 x 1024
The calculation does not include the space required by the metadata and file headers but most of the time, their contributions are negligible.
Bitrate is measured using bits per second, or bps. 1000 bps is equal to 1 kilobits per seconds (kbps), 1000 kbps is equal to 1 megabits per seconds (mbps), you get the point.
Who chooses this bitrate thing?
The bitrate is chosen by the person who compresses the video every time a video is compressed. Initially, when the video is captured by the camera, the software inside the camera defaults to a higher, general purpose bitrate in order to maximize quality. Then the user of the initial compression (you) is allowed to re-compress as needed . If you decide to leave the initial video as it is, it is guaranteed to consume more storage for the same duration with each release of a new iPhone/iPad.
Bitrate represents the amount of information a video file is allowed to store. The more information there is, the better the visuals and the audio are. A video with twice the frame rate of another video that is otherwise the same will require twice the bitrate (ignoring the audio) to visually appear the same. A video of twice the width and height (in pixels) will require at least four times the bitrate not to sacrifice some color detail.
As the developer, understanding how the video is captured provides more flexibility when deciding to sacrifice quality to save some storage and bandwidth. Often, the only valid option is to try as many different bitrates as you can and compare the results to find the best compromise.
If bitrate is the king, why are there so many codecs/algorithms/standards?
Some codecs work well for high bitrates but suck at lower values and Some work really well if the video isn’t shaky. The codec you prefer is not a quantitative decision, but a qualitative one. In most mobile phones, if you are not willing to include external libraries to support other standards, your best option tends to be H264.
How do I compress a H264 video?
In this tutorial, we are going to use Swift 4 with no external dependencies. Native AVFoundation Framework includes all the tools we need. The resulting code will work on iOS 9 and greater. Once we fully implement the code, what we will get is a single free function such that, when called, will compress a single video file with a given configuration and notify us for success or error with callbacks. All the work will be done in a background thread, therefore our app’s UI will remain responsive enough to do other work, such as showing loading animations.
Let’s make a list of things we’d like our function to be able to do:
- Grab a video for a given URL
- Ask the destination URL for the compressed video
- Optionally adjust the video resolution
- Fix orientation issues caused by device cameras (i.e mirror the video for front camera)
- Set compression parameters (bitrate, sample rate etc)
- Notify with a callback once the compression is complete
- Notify with a callback if an error occurs
- Allow canceling a started compression and notify the cancel with a callback
We are going to use a test drive approach and start with a function interface which doesn’t compile but expresses everything we listed above. Then we will implement the missing types and functionalities one at a time to reach our goal.
func compressh264VideoInBackground(
    videoToCompress:      URL,
    destinationPath:      URL,
    size:                 CompressionSize?,
    compressionTransform: CompressionTransform,
    compressionConfig:    CompressionConfig,
    completionHandler:    @escaping (URL)->(),
    errorHandler:         @escaping (Error)->(),
    cancelHandler:        @escaping ()->()
) -> CancelableCompression {
    // implementation
}
We used native URL type to ask for file paths.
We used @escaping blocks for our callbacks. The reason they are @escaping is because they will be called some other time after our function returns, in a background thread. Completion callback will be notified with a URL parameter representing the compressed file path and the error callback will be notified with an object conforming to Error protocol.
We used four non existing types which we will implement to represent,
- the video resolution:
CompressionSize?(nil for not adjusting) - orientation fixes:
CompressionTransform - fine tuning:
CompressionConfig - and the cancel operation:
CancelableCompression.
We could have used CGSize for the resolution but its nested width and height values have the type of CGFloat that clashes with the fact that width or height of a video can only be represented in integers. A named tuple will do the trick here:
typealias CompressionSize = (width: Int, height: Int)
As you may already know, it is sometimes desirable to mirror the video captured by the front camera so as to not distract users visually. Also, there is the possibility that if video captured by the back camera uses the portrait mode instead of landscape mode, the initially captured video will express this orientation as EXIF metadata instead of literally arranging the pixels.
EXIF is the methodcameras use to attach additional information to captured media. Some video players honor the instructions given in EXIF and adjust the video accordingly but some video players don’t. If this happens, your portrait video may appear to be flipped by 90 degrees and look funny. In order to handle this kind of error in a conservative manner, apply the transformation in the EXIF to pixel data directly, and then remove the EXIF entirely.
We will give our users the option to fixing video orientation via an enumeration
enum CompressionTransform {
    case keepSame
    case fixForBackCamera
    case fixForFrontCamera
}
There are many configurable compression parameters other than bitrate. However, this tutorial will only deal with what is available and really relevant. We will also provide a default configuration as a quality of life improvement. A curious reader can find information about missing parameters in the AVFoundation documentation if they wish, as the approach is quite straightforward to extend.
struct CompressionConfig {
    let videoBitrate: Int
    let videomaxKeyFrameInterval: Int
    let avVideoProfileLevel: String
    let audioSampleRate: Int
    let audioBitrate: Int

    static let defaultConfig = CompressionConfig(
        videoBitrate: 1024 * 750, // in bps
        videomaxKeyFrameInterval: 30,
        avVideoProfileLevel: AVVideoProfileLevelH264High41,
        audioSampleRate: 22050,
        audioBitrate: 80000 //in bps
    )
}
As you may have already guessed, videoBitrate and audioBitrate reflect what they are named after. For example: the music you buy from iTunes has the audio bitrate of 256 kbps. You can adjust it to your taste if you find 80 kbps too low.
Youtube suggests using a video bitrate of roughly 5 mpbs for videos of 720p in order to work best on all kinds of devices. A useful approach is to try multiple bitrates and compare results for the best visuals, (a good start for incremental changes is a really low bitrate of 768 kbps(1024×750 bps.)
Audio sample rate is the rate that the output audio samples produced by your speaker/headphones can change over one second. The higher the value, the more the digital nature of the audio is hidden from the listener. Normally, 22050 sounds good enough on cheap headphones, 44100 is considered the standard for CD Players and 48000 is the sample rate used by DVD Players. Blu-rays sometimes go as high as 96000 but for mobile phones, a value this high is almost always overkill. audio sample rate is measured in Hertz (Hz).
Modern compression algorithms tend to abuse the fact that a video recorded by a person cannot jump long distances or angles. It is quite common for videos to show content taken by a moving or rotating camera instead of random still pictures. If two consecutive video frames contain similar scenes, the compression algorithm can eliminate the duplicate pixels if they exist, saving a lot of space.
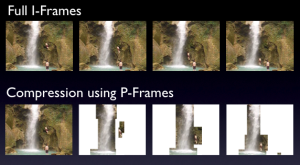
Picture 1: Comparison of two video samples, one is uncompressed, the other is compressed. (source: https://sintwo.wordpress.com/2014/11/25/the-art-of-datamoshing/)
The waterfall and the man in the above picture are the only moving objects in the scene. Thus, the surrounding rocks needn’t be stored multiple times in the video data. After the initial key frame, the consecutive frames are stored as sparse pixel arrays.
This technique works really well for small cuts of content but every once in a while, a full picture of the scene should be included in the video to avoid unnecessary artifacts. In order to limit this kind of behavior in the compression, videomaxKeyFrameInterval
s used to specify how many sparse frames we are allowed to use before we insert a full one. A higher value, will mean more visible artifacts but less compression time. A lower value will mean more time to compress the video and may cause some video players to stutter while drawing too many whole frames so close together. In this case, it is a tradeoff between compression/playback performance and visual quality rather than storage space and visual quality as we discussed in the previous bitrate example .
Our last configuration parameter isavVideoProfileLevel, which sets the compatibility level of our video. H264 standard defines many profile levels to capture many devices’ capabilities, ranging from really low-end, low performance devices to really powerful, 4K TV processors. Profile level of High 4.1 is a common denominator among a vast number of smartphones, so we choose the default value of AVVideoProfileLevelH264High41 in our implementation. You can find the available options in the AVFoundation documentation.
Lastly, we’d like to define a wrapper for a single boolean to allow interruption of previously started compression. We will return an instance of it to the caller to let him/her notify the background thread for cancelling compression loop.
class CancelableCompression {
    var cancel = false
}
We will need some utilities before we get into the implementation: an error type to express unexpected behavior in our compression, a simple utility extension to convert angle values between degrees and radians and a global dispatch queue for our background thread.
fileprivate let compressQueue = DispatchQueue(
    label: "compressQueue",
    qos: .background
)

extension Int {
    fileprivate var degreesToRadiansCGFloat: CGFloat {
        return CGFloat(Double(self) * Double.pi / 180)
    }
}

struct CompressionError: LocalizedError {
    let title: String
    let code: Int

    init(title: String = "Compression Error", code: Int = -1) {
        self.title = title
        self.code = code
    }
}
We are now ready to implement our compression function. The rest of this tutorial will simply be plumbing. We will configure and attach instances of classes provided by AVFoundation to each other, set some flags, queue a while loop that compresses video frames one by one to background thread and notify our caller via provided callbacks.
First insert the following imports to the beginning of your file to prevent native type errors:
import AVFoundation
import AssetsLibrary
import Foundation
import QuartzCore
import UIKit
Let’s remember our previously defined interface:
func compressh264VideoInBackground(
    videoToCompress:      URL,
    destinationPath:      URL,
    size:                 CompressionSize?,
    compressionTransform: CompressionTransform,
    compressionConfig:    CompressionConfig,
    completionHandler:    @escaping (URL)->(),
    errorHandler:         @escaping (Error)->(),
    cancelHandler:        @escaping ()->()
) -> CancelableCompression {
We will close the curly brace at the end of the article.
Let’s define the thread local variables that are required during the compression by combining them in a custom, nested type:
class CompressionContext {
    var cgContext: CGContext?
    var pxbuffer: CVPixelBuffer?
    let colorSpace = CGColorSpaceCreateDeviceRGB()
}
Apple uses a simple naming convention inside its media frameworks. CV is the abbreviation for Core Video, meaning they are video related types. CI is the abbreviation for Core Image, meaning they are image, hence pixel related types. CG is the abbreviation for Core Graphics, meaning they are GPU (OpenGL or Metal) related types.
CGContext is required to draw frames. It will use internal OpenGL drivers to do the drawing as well as the orientation fix. Since we will compress video frames one by one, we will only require one of these which we will recycle multiple times.
CVPixelBuffer is required to store temporary pixel data for a single frame. As before, we will compress video frames one by one, so we will only require one of these that will be recycled multiple times.
All of our pixels will be opaque, thus we only need a color space of RGB.
Our compression loop will read the source video frame by frame, manipulate the read frame according to a specified transformation (to resize, rotate etc), and write it to a destination buffer (pxbuffer). Then the framework will compress the buffer. If we have a simple utility function that does this for a single frame, we can use it an unlimited number of times in a loop! The function below does that in the documented manner:
func getCVPixelBuffer(
    _ i: CGImage?,
    compressionContext: CompressionContext) -> CVPixelBuffer? {

    // Unwrap our image to get rid of safety checks (assume frame is ready)
    weak var image = i!
    let imageWidth = image!.width
    let imageHeight = image!.height

    let attributes : [AnyHashable: Any] = [
        kCVPixelBufferCGImageCompatibilityKey : true as AnyObject,
        kCVPixelBufferCGBitmapContextCompatibilityKey : true as AnyObject
    ]

    // If first frame, allocate the buffer, otherwise recycle the previous
    if compressionContext.pxbuffer == nil {
        CVPixelBufferCreate(kCFAllocatorSystemDefault,
                            imageWidth,
                            imageHeight,
                            kCVPixelFormatType_32ARGB,
                            attributes as CFDictionary?,
                            &compressionContext.pxbuffer)
    }

    // Draw frame to newly allocated buffer
    if let _pxbuffer = compressionContext.pxbuffer {
        let flags = CVPixelBufferLockFlags(rawValue: 0)
        CVPixelBufferLockBaseAddress(_pxbuffer, flags)
        let pxdata = CVPixelBufferGetBaseAddress(_pxbuffer)

        // If first frame, allocate a context
        if compressionContext.cgContext == nil {
            compressionContext.cgContext = CGContext(
                data: pxdata,
                width: imageWidth,
                height: imageHeight,
                bitsPerComponent: 8,
                bytesPerRow: CVPixelBufferGetBytesPerRow(_pxbuffer),
                space: compressionContext.colorSpace,
                bitmapInfo: CGImageAlphaInfo.noneSkipFirst.rawValue)
        }

        if let _context = compressionContext.cgContext, let image = image {
            _context.draw(
                image,
                in: CGRect(x: 0, y: 0, width: imageWidth, height: imageHeight)
            )
        }
        else {
            CVPixelBufferUnlockBaseAddress(_pxbuffer, flags)
            return nil
        }

        CVPixelBufferUnlockBaseAddress(_pxbuffer, flags)
        return _pxbuffer;
    }

    return nil
}
We now have a way to copy pixels from a video frame to a buffer. Lets instantiate the utilities to read and write frames from a source video into a destination file. In order to do that, we will use AVURLAsset, AVAssetReader and AVAssetWriter classes.
// Asset, Output File
let avAsset = AVURLAsset(url: videoToCompress)
let filePath = destinationPath

do {
// Reader and Writer
let writer = try AVAssetWriter(
    outputURL: filePath,
    fileType: AVFileType.mp4
)
let reader = try AVAssetReader(asset: avAsset)
We need to extract existing audio and video tracks from our source asset to be able use metadata inside them.
// Tracks
let videoTrack = avAsset.tracks(
    withMediaType: AVMediaType.video
).first!
let audioTrack = avAsset.tracks(
    withMediaType: AVMediaType.audio
).first!
We need to define how to write frames to the destination file will involve all of the codec configurations we have previously discussed. If any errors occur during the setup, we will warn the user and return prematurely. Below is the necessary plumbing to do that:
// Video Output Configuration
let videoCompressionProps: Dictionary<String, Any> = [
    AVVideoAverageBitRateKey : compressionConfig.videoBitrate,
    AVVideoMaxKeyFrameIntervalKey : compressionConfig.videomaxKeyFrameInterval,
    AVVideoProfileLevelKey : compressionConfig.avVideoProfileLevel
]

let videoOutputSettings: Dictionary<String, Any> = [
    AVVideoWidthKey : size == nil ? videoTrack.naturalSize.width : size!.width,
    AVVideoHeightKey : size == nil ? videoTrack.naturalSize.height : size!.height,
    AVVideoCodecKey : AVVideoCodecType.h264,
    AVVideoCompressionPropertiesKey : videoCompressionProps
]
let videoInput = AVAssetWriterInput(
    mediaType: AVMediaType.video,
    outputSettings: videoOutputSettings
)
videoInput.expectsMediaDataInRealTime = false

// OpenGL pixel format must be 4 byte,
// so we use 32RGBA and ignore the Alpha at the end
let sourcePixelBufferAttributesDictionary: Dictionary<String, Any> = [
    String(kCVPixelBufferPixelFormatTypeKey) : Int(kCVPixelFormatType_32RGBA),
    String(kCVPixelFormatOpenGLESCompatibility) : kCFBooleanTrue
]
let pixelBufferAdaptor = AVAssetWriterInputPixelBufferAdaptor(
    assetWriterInput: videoInput,
    sourcePixelBufferAttributes: sourcePixelBufferAttributesDictionary
)

videoInput.performsMultiPassEncodingIfSupported = true
guard writer.canAdd(videoInput) else {
    errorHandler(CompressionError(title: "Cannot add video input"))
    return CancelableCompression()
}
writer.add(videoInput)
We need to define how to write audio samples to the destination file will involve all of the codec configurations we have previously discussed. If any errors occur during the setup, we will warn the user and return prematurely. Below is the necessary plumbing to do that:
// Audio Output Configuration
var acl = AudioChannelLayout()
acl.mChannelLayoutTag = kAudioChannelLayoutTag_Stereo
acl.mChannelBitmap = AudioChannelBitmap(rawValue: UInt32(0))
acl.mNumberChannelDescriptions = UInt32(0)

let acll = MemoryLayout<AudioChannelLayout>.size
let audioOutputSettings: Dictionary<String, Any> = [
    AVFormatIDKey : UInt(kAudioFormatMPEG4AAC),
    AVNumberOfChannelsKey : UInt(2),
    AVSampleRateKey : compressionConfig.audioSampleRate,
    AVEncoderBitRateKey : compressionConfig.audioBitrate,
    AVChannelLayoutKey : NSData(bytes:&acl, length: acll)
]
let audioInput = AVAssetWriterInput(
    mediaType: AVMediaType.audio,
    outputSettings: audioOutputSettings
)
audioInput.expectsMediaDataInRealTime = false

guard writer.canAdd(audioInput) else {
    errorHandler(CompressionError(
        title: "Cannot add audio input"
    ))
    return CancelableCompression()
}
writer.add(audioInput)
As you can see in the example above, we have hard-coded the audio codec configuration as AAC and it assumes two audio channels (stereo) for the audio. If this your case is different, you may need to extend it to your preference. Remember that audio configuration parameters must be of type UInt.
This is a compatibility constraint caused by AVFramework being written in Obj-C in an unsigned manner.
We also need to define how to read frames from the input file. It is very unlikely for you to find an H264 video that doesn’t use kCVPixelFormatType_422YpCbCr8_yuvs color space, so our constants are hardcoded as is. If your videos use a different format, you may need to extend the configuration . If any errors occur during the setup, we will warn the user and return prematurely. Below is the necessary plumbing to do that:
// Video Input Configuration
let videoOptions: Dictionary<String, Any> = [
    kCVPixelBufferPixelFormatTypeKey as String :
        UInt(kCVPixelFormatType_422YpCbCr8_yuvs),
    kCVPixelBufferIOSurfacePropertiesKey as String : [:]
]
let readerVideoTrackOutput = AVAssetReaderTrackOutput(
    track: videoTrack,
    outputSettings: videoOptions
)

readerVideoTrackOutput.alwaysCopiesSampleData = true

guard reader.canAdd(readerVideoTrackOutput) else {
    errorHandler(CompressionError(
        title: "Cannot add video output"
    ))
    return CancelableCompression()
}
reader.add(readerVideoTrackOutput)
We need to define how to read audio samples from the input file. If any errors occur during the setup, we will warn the user and return prematurely. Below is the necessary plumbing to do that:
// Audio Input Configuration
let decompressionAudioSettings: Dictionary<String, Any> = [
    AVFormatIDKey: UInt(kAudioFormatLinearPCM)
]
let readerAudioTrackOutput = AVAssetReaderTrackOutput(
    track: audioTrack,
    outputSettings: decompressionAudioSettings
)

readerAudioTrackOutput.alwaysCopiesSampleData = true

guard reader.canAdd(readerAudioTrackOutput) else {
    errorHandler(CompressionError(title: "Cannot add video output"))
    return CancelableCompression()
}
reader.add(readerAudioTrackOutput)
We have to decide whether we will write the frames as they are or transform them according to the desired orientation fix. Below is the configuration to do that.
// Orientation Fix for Videos Taken by Device Camera
var appliedTransform: CGAffineTransform
switch compressionTransform {
case .fixForFrontCamera:
    appliedTransform = CGAffineTransform(
        rotationAngle: 90.degreesToRadiansCGFloat
    ).scaledBy(x:-1.0, y:1.0)
case .fixForBackCamera:
    appliedTransform = CGAffineTransform(
        rotationAngle: 270.degreesToRadiansCGFloat
    )
case .keepSame:
    appliedTransform = CGAffineTransform.identity
}
Note that scaling by -1.0 along an axis corresponds to mirroring along that axis. If any other transformation is needed for your video, you can add more cases to this block.
Let’s mark the beginning of our compression:
// Begin Compression
reader.timeRange = CMTimeRangeMake(kCMTimeZero, avAsset.duration)
writer.shouldOptimizeForNetworkUse = true
reader.startReading()
writer.startWriting()
writer.startSession(atSourceTime: kCMTimeZero)
Above lines do not actually start the compression. They simply tell the framework to store all the states in an immutable manner for us to be able to loop effectively. We will do the copying by hand and the framework will compress the copied frames one by one.
We are now ready for compression. The rest of the implementation will pass the remaining work to the background thread and return immediately to the caller. All progress will be notified via provided callbacks.
Let’s allocate our OpenGL and compression contexts and loop the frames:
// Compress in Background
let cancelable = CancelableCompression()
compressQueue.async {
    // Allocate OpenGL Context to Draw and Transform Video Frames
    let glContext = EAGLContext(api: .openGLES2)!
    let context = CIContext(eaglContext: glContext)
    let compressionContext = CompressionContext()

    // Loop Video Frames
    var frameCount = 0
    var videoDone = false
    var audioDone = false

    while !videoDone || !audioDone {
We need to make sure everything is going well on the reader and writer side. If the reader fails during the loop, chances are the file is corrupted in the middle or has been deleted before the compression is complete. If the writer fails, it may have run out of disk space.
        // Check for Writer Errors (out of storage etc.)
        if writer.status == AVAssetWriterStatus.failed {
            reader.cancelReading()
            writer.cancelWriting()
            compressionContext.pxbuffer = nil
            compressionContext.cgContext = nil

            if let e = writer.error {
                errorHandler(e)
                return
            }
        }

        // Check for Reader Errors (source file corruption etc.)
        if reader.status == AVAssetReaderStatus.failed {
            reader.cancelReading()
            writer.cancelWriting()
            compressionContext.pxbuffer = nil
            compressionContext.cgContext = nil

            if let e = reader.error {
                errorHandler(e)
                return
            }
        }
If none of the possible device errors occur, maybe our caller decides to cancel the compression.
        // Check for Cancel
        if cancelable.cancel {
            reader.cancelReading()
            writer.cancelWriting()
            compressionContext.pxbuffer = nil
            compressionContext.cgContext = nil
            cancelHandler()
            return
        }
If there is no error and the compression is not cancelled, then we can start reading pixels. AVAssetReader reads pixel data in an internal private thread. If that thread lags behind ours, it may cause frames to have missing pixels. If this occurs, we should stop reading any data for a few miliseconds (~1ms). Otherwise, continue the copy.
            // Check if enough data is ready for encoding a single frame
            if videoInput.isReadyForMoreMediaData {
                // Copy a single frame from source to
                //destination with applied transforms
                if let vBuffer = readerVideoTrackOutput.copyNextSampleBuffer(),
                    CMSampleBufferDataIsReady(vBuffer) {
                        frameCount += 1
                        print("Encoding frame: ", frameCount)

                        autoreleasepool {
                            let presentationTime =
                                CMSampleBufferGetPresentationTimeStamp(vBuffer)
                            let pixelBuffer =
                                CMSampleBufferGetImageBuffer(vBuffer)!

                            CVPixelBufferLockBaseAddress(
                                pixelBuffer,
                                CVPixelBufferLockFlags(rawValue:0)
                            )

                            let transformedFrame = CIImage(
                                cvPixelBuffer: pixelBuffer
                            ).transformed(by: appliedTransform)

                            let frameImage = context.createCGImage(
                                transformedFrame,
                                from: transformedFrame.extent
                            )
                            let frameBuffer = getCVPixelBuffer(
                                frameImage,
                                compressionContext: compressionContext
                            )

                            CVPixelBufferUnlockBaseAddress(
                                pixelBuffer,
                                CVPixelBufferLockFlags(rawValue: 0)
                            )

                            _ = pixelBufferAdaptor.append(
                                frameBuffer!,
                                withPresentationTime: presentationTime
                            )
                        }
                } else {
                    // Video source is depleted, mark as finished
                    if !videoDone {
                        videoInput.markAsFinished()
                    }
                    videoDone = true
                }
            }
As you can see, we called the initially defined helper which copies a single frame to a destination buffer. Note that we apply the transformation to read CIImage before we send it to destination, we can also transform or add additional modifications here. . There are many other image manipulation tools at your disposal in CorelImage.
We should check and make sure that we are ready for the audio as well. Otherwise we are okay.
        if audioInput.isReadyForMoreMediaData {
             // Copy a single audio sample from source to destination
             if let aBuffer = readerAudioTrackOutput.copyNextSampleBuffer(),
                 CMSampleBufferDataIsReady(aBuffer) {
                     _ = audioInput.append(aBuffer)
             } else {
                 // Audio source is depleted, mark as finished
                 if !audioDone {
                     audioInput.markAsFinished()
                 }
                 audioDone = true
             }
        }
Here is the mentioned 1ms break before next iteration.
        // Let background thread rest for a while
        Thread.sleep(forTimeInterval: 0.001)
    } // end while
If our loop ends successfully, we can write all the remaining data to the destination file and notify our caller.
    // Write everything to output file
    writer.finishWriting(completionHandler: {
        compressionContext.pxbuffer = nil
        compressionContext.cgContext = nil
        completionHandler(filePath)
    })
} // end queue.async
Above code marks the end of the job we sent to the background thread. Below, you find the cancel wrapper we allocated before scheduling the compression, returned to the caller. Since our background thread strongly captured the wrapper before we returned, our thread will have access to our caller’s intention about whether it should cancel or not.
    // Return a cancel wrapper for users to
    // let them interrupt the compression
    return cancelable
} // end do
Lastly, we check if any error is thrown during the configuration phase. If so, we return prematurely and notify our caller with the thrown error.
catch {
    // Error During Reader or Writer Creation
    errorHandler(error)
    return CancelableCompression()
}
Our implementation has completed. We can close the function level curly braces.
} // end function
Final Result and Usage
If everything checks and the code compiles, below usage example should work as expected. You can find an example project in the link below as well as a single file implementation of what we discussed in this article.
// Get source video
let videoToCompress = //any valid URL pointing device storage

// Declare destination path and remove anything exists in it
let destinationPath = URL(
    fileURLWithPath: NSTemporaryDirectory()
).appendingPathComponent("compressed.mp4")
try? FileManager.default.removeItem(at: destinationPath)

// Compress
let cancelable = compressh264VideoInBackground(
    videoToCompress: videoToCompress,
    destinationPath: destinationPath,
    size: nil, // nil preserves original,
    //size: (width: 1280, height: 720)
    compressionTransform: .keepSame,
    compressionConfig: .defaultConfig,
    completionHandler: { [weak self] path in
        // use path
    },
    errorHandler: { e in
        print("Error: ", e)
    },
    cancelHandler: {
        print("Canceled.")
    }
)

// To cancel compression, set cancel flag to true and wait for handler invoke
cancelable.cancel = true
What else can I do?
The code provided can actually be used to compress standalone audio as well. The only modification you need to make is to remove anything related to video including writer configuration, tracks, OpenGL contexts and pixel buffers.
The code will work even if the device is locked if you execute it after you call application.beginBackgroundTask() as stated in Apple’s Background Execution docs.The only catch is that it will work in a low performance mode, so you will only be able to compress short videos before the allowed time limit for background execution will run out.
Conclusion
Apple, despite providing really powerful tools to accomplish complex tasks, Apple will sometimes let you shoot yourself in the foot. This article is an attempt to prevent that if you plan to engage with AVFoundation Framework. Please feel free to leave a comment if you have any questions about this article. If you enjoyed this article, we would appreciate your constructive feedback to write more! Until next time, peace!
Give me the code!
Example Project: https://github.com/testfairy-blog/VideoCompressionTutorial
All the code in this article: https://github.com/testfairy-blog/VideoCompressionTutorial/blob/master/VideoCompressionTutorial/VideoCompression.swift
Credits
- Photo by JJ Ying on Unsplash.
Sources
- https://developer.apple.com/documentation/avfoundation/media_assets_playback_and_editing/asset_file_import_and_export
- https://developer.apple.com/library/archive/samplecode/ReaderWriter/Listings/Objective_C_AVReaderWriterOSX_AAPLDocument_m.html#//apple_ref/doc/uid/DTS40011124-Objective_C_AVReaderWriterOSX_AAPLDocument_m-DontLinkElementID_5
- https://medium.com/@rodrigo_freitas/a-simple-ios-view-to-play-video-b7ee05f9ce6a
- https://sintwo.wordpress.com/2014/11/25/the-art-of-datamoshing/