Mobile testing in cloud is a joy. It is the most cost effective way of locating bugs in your mobile app before shipping to production. So far, we’ve enjoyed these services for native mobile apps. This time, we will be investigating how to make it work for Flutter apps. AWS Device Farm provides a large pool devices which are capable of running instrumentation jobs for many frameworks and Flutter is not an exception.
What you need
There are two common methods to test a Flutter app. First one is driving the app with an outside device using the flutter_driver library. This is useful when the phone being used is in close proximity to your workstation, which is not the case for cloud tests. The method we are interested in uses the new integration_test package. Apps tested with integration_test can build their instrumentation as standalone app bundles. APK files generated with this kind of instrumentation can be distributed to remote devices without requiring physical access. The only requirement needed is the ability to run Espresso tests, which AWS Device Farm already supports. We will be using Dart without null-safety for our examples but at the time we are writing this post, integration_test package has already started migrating to null-safe Dart.
How to integrate
Add integration_test package as a development dependency inside your pubspec.yaml file.
dev_dependencies:
  integration_test: ^1.0.0
Run flutter pub get to install your new dependencies. Create a folder named integration_test inside your project root and create these two Dart files in it.
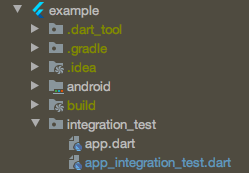
The file named app.dart will be used to initialize the driver. In most cases, you will only need to prepare this file once unless your app has special launch options. If that is the case, please refer to the official docs to learn about complex use cases. Your app tests will go into the other file named app_integration_test.dart. You can have multiple of these, named after your needs but we will keep it simple in this guide. Initialize the driver in app.dart:
// app.dart

import 'package:integration_test/integration_test_driver.dart';

Future<void> main() => integrationDriver();
Then prepare your tests in app_integration_test.dart:
import 'package:flutter/widgets.dart';
import 'package:flutter_test/flutter_test.dart';
import 'package:integration_test/integration_test.dart';

import 'package:your_app/main.dart' as app;

void main() {
  IntegrationTestWidgetsFlutterBinding binding =
      IntegrationTestWidgetsFlutterBinding.ensureInitialized()
          as IntegrationTestWidgetsFlutterBinding;

  final Finder errorTextFinder = findByValueKey('errorMessage');

  setUpAll(() async {});

  // A single test case
  testWidgets(testName, (WidgetTester tester) async {
      app.main();
      binding.ensureVisualUpdate();
      await binding.waitUntilFirstFrameRasterized;
      await tester.pumpAndSettle();

      // Your tests go here

      // Example
      final String x =
          (errorTextFinder.evaluate().single.widget as Text).data ??
              'No error yet';
      print('$testName: $x');

      expect(x, 'No error yet.');
  });
}
Open android/app/build.gradle and add the following dependencies:
android {
    ...

    defaultConfig {
        ...

        // Add this
        testInstrumentationRunner "androidx.test.runner.AndroidJUnitRunner"
    }

    ...
}

dependencies {
    // Add these
    testImplementation 'junit:junit:4.12'
    androidTestImplementation 'androidx.test:runner:1.2.0'
    androidTestImplementation 'androidx.test.espresso:espresso-core:3.2.0'

    ...
}
Create an Android instrumentation test file named MainActivityTest.java alongside its parent directory structure like below.
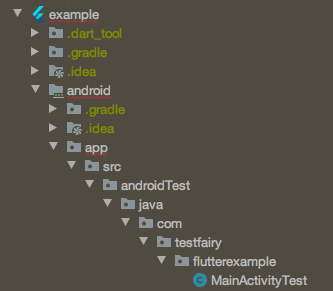
We will run this new test class with Flutter’s custom instrumentation runner which will automatically communicate with Dart VM to run our test cases written in dart. Prepare MainActivityTest.java with the following code.
package com.testfairy.flutterexample;

import androidx.test.rule.ActivityTestRule;
import dev.flutter.plugins.integration_test.FlutterTestRunner;
import org.junit.Rule;
import org.junit.Test;
import org.junit.runner.RunWith;

@RunWith(FlutterTestRunner.class)
public class MainActivityTest {
  @Rule
  public ActivityTestRule<MainActivity> rule = new ActivityTestRule<>(MainActivity.class, true, false);

  @Test
  public void escapeStaticAnalysisInAws() {
    // DON'T REMOVE THIS
  }
}
Make sure you don’t delete escapeStaticAnalysisInAws() since it will help us run these test on AWS Device Farm without having parsing issues. It is just a stub that will never run, so its body can be left empty. Finally, create a file named build-tests-with-integration.sh and paste the following code in it.
#!/usr/bin/env bash

set -x
set -e

pushd android

# flutter build generates files in android/ for building the app
flutter build apk
./gradlew app:assembleAndroidTest -Ptarget=`pwd`/../integration_test/app_integration_test.dart -Pdriver=`pwd`/../integration_test/app.dart
./gradlew app:assembleDebug -Ptarget=`pwd`/../integration_test/app_integration_test.dart -Pdriver=`pwd`/../integration_test/app.dart

popd
This file when executed, will build your app and its instrumentation tests as two separate APKs. These will be the files we upload to AWS Device Farm to run our test suite. Open up a terminal in your project root and run the script:
bash build-tests-with-integration.sh
It will create the following files:
-
- build/app/outputs/apk/androidTest/debug/app-debug-androidTest.apk
- build/app/outputs/apk/debug/app-debug.apk
Upload to AWS Device Farm
Launch AWS Device Farm dashboard and create a new project named after your Flutter app.
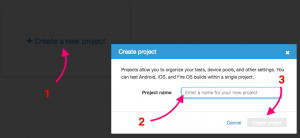
Inside your new project, create a new run. Choose native application and select app-debug.apk to upload. Then click “Next Step”.
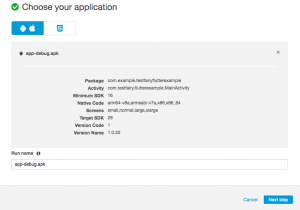
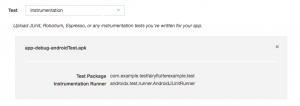
Choose “Instrumentation” from the test drop-down and upload app-debug-androidTest.apk as your instrumentation.
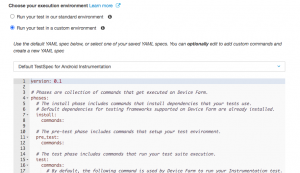
Choose “Run your test in a custom environment” and proceed to the next step without modifying the automatically generated run script.
Configure the remaining steps according to your needs or just use the defaults if they are okay. Confirm and start run.
See The Results in TestFairy Platform (optional)
When AWS allocates an idle device to you, your tests will run and you will be reported the result by the Device Farm dashboard.
If you included the TestFairy SDK in your instrumentation, you will also be able to take a look at what went wrong with your tests. Proceed to your TestFairy dashboard and find the project named after your app. All the sessions you are shown here will match with its corresponding Device Farm test case.
A session with an error will include the entire stacktrace of the failed test case.

From this point, you can make a few changes in your app code, run the tests again, and eliminate issues one by one until you are shown the happy green screen.

Get the results with less clicks (optional)
Navigating through a bunch of dashboards isn’t that automatic. We built TestFairy QuickView Chrome Extension to get the same results without ever leaving the AWS Device Farm dashboard. Take a look at the files section of your tests to see it in action.

Here, you will be able to create a ticket in your favorite bug tracker, provided you configured it in your TestFairy dashboard before.
Right below the stack trace, you will see a button named Create Bug.

Click that and in a few seconds, without leaving Device Farm, you will be notifying your team members about the issue you encountered. All session data, trimmed to be able to focus on this specific bug, will automatically be attached to the issue so that your team members have all the necessary info including the video to figure out what went wrong.
Stay Tuned
In this post, we investigated how to run Flutter integration tests on AWS Device Farm. For non-Flutter projects, we have a similar post in which we achieve the same result for regular instrumentations. Feel free to check it out!
Let us know if you think we must integrate with your favorite testing framework or issue tracker.
Until next time – #staysafe

